HUBIC.COM 云存储 For CentOS 6 安装使用
先配置环境
安装依赖包
yum -y install gcc make fuse-devel curl-devel libxml2-devel \
openssl-devel json-c-devel unzip
下载客户端软件包
cd /opt
wget https://github.com/TurboGit/hubicfuse/archive/master.zip
unzip master.zip
cd hubicfuse-master
导入环境变量 如果你非64位系统可免
编译安装
export PKG_CONFIG_PATH=/lib64/pkgconfig/
./configure
make
sudo make install
安装完成
查看HELP内容
/usr/local/bin/hubicfuse -h
=========== 配置认证信息 ==============
先在 https://hubic.com/home/browser/developers/
创建一个app应用
获得client id 和 密匙
然后
cd /opt/hubicfuse-master/
./hubic_token
按提示输入信息即可
最后生成的信息这个样子的
client_id=[Hubic client id for the registered application]
client_secret=[Hubic client secret for the registered application]
refresh_token=[A refresh token you got from the script]
把这个内容保存到
$HOME/.hubicfuse
如果你是root用户 这个文件应该保存在 /root/.hubicfuse
============== 挂载测试 =============
OK 现在挂载下测试
mkdir /backup
我们先使用Debug模式挂载 看下有无错误
/usr/local/bin/hubicfuse -d /backup -o noauto_cache,sync_read,allow_other
OK 无问题
那么挂载使用吧
/usr/local/bin/hubicfuse /backup -o noauto_cache,sync_read,allow_other
如果需要设置开机启动
vi /etc/fstab
hubicfuse /backup root root,noauto,noauto_cache,sync_read,allow_other 0 0
=========== 实际使用 =============
我本地机器操作文件 复制 移动 删除
FTP上传 删除 覆盖 都无问题的
截图
FTP 上传文件
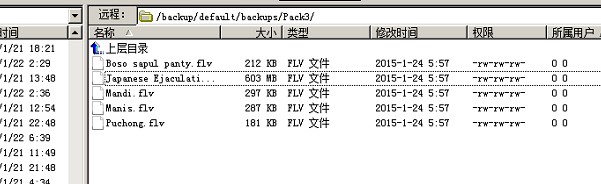
Web 查看文件

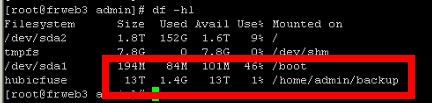
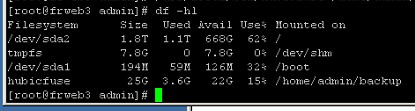
终端挂载信息
补一个升级以后13T = 13000G 存储空间
我设的异步同步文件 先缓存在内核里 这样的实际上传速度100M/秒的样子 非常快
服务器法国巴黎的 可能有一定关系
我照你的方法试了,怎么提示错误啊
!!! HUBIC cannot get json field ‘token’
Failed to authenticate.
安装都是正确的,没见什么错误
!!! HUBIC cannot get json field ‘token’
Failed to authenticate.
不能获得 json 的token 字段
认证错误
这个提示很清楚的